First time poster here, I just want to thank everyone for their insights on the forum! It’s rather easy to do a mod on a Wyze camera to enable it to zoom in and actually read license plates of vehicles crossing in front of it.
Some neighbors had criminal events happen, and discovered the most important part of the video that would help law enforcement was the identity of the vehicle, not necessarily just a color/make/model. But, the wide angle lenses on most consumer grade hardware makes identification impossible.
I was able to do a lens replacement on to my Wyze v2 to obtain this result. (I blurred out the front half of the plate on purpose).
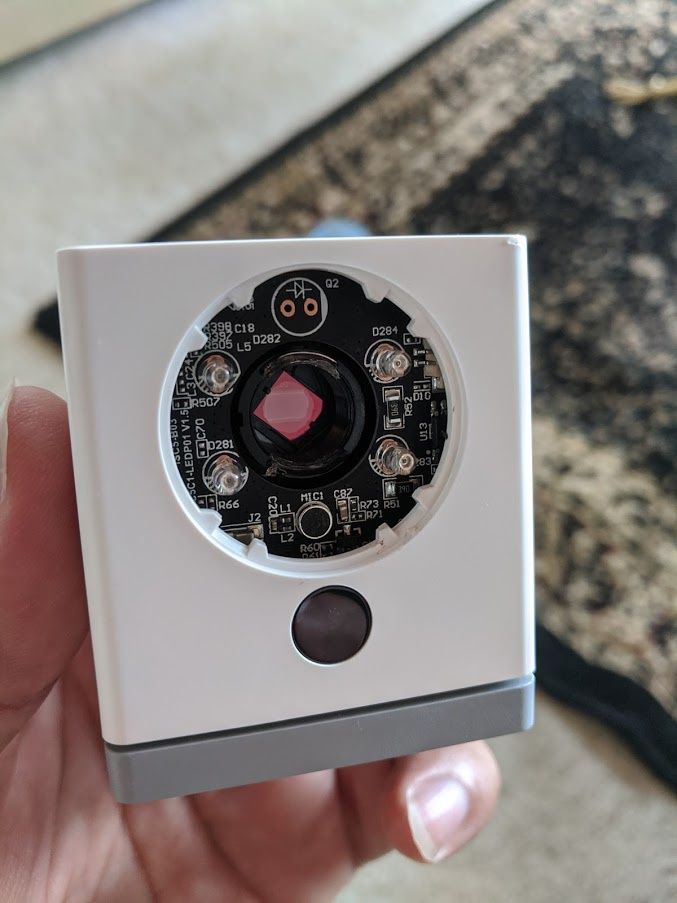
The main challenge is to make sure you configure your camera BEFORE you dismantle it. Once you have it working you can take it apart pretty easy to replace the lens. All you’ll need is a small screwdriver set and some patience to make sure you don’t misplace any of the teeny tiny screws. It’ll help to take a few cell phone photos to remember how things were routed and plugged in.
Once re-assembled, this lens is almost the same size as the one already in the camera. It protrudes out just far enough for you to still grab it with your finger and focus things.
The motion detection and automation still work as normal (this isn’t a panning Wyze though). Now every car that drives by gets recorded and archived.
I used one of the outdoor covers over my Wyze, but the lens area is still exposed to the elements. Nothing bad seems to have happened with recent rains, but I don’t live in brutal cold/hot areas so I don’t know what happens over time.
Unfortunately this only works in the daytime… once the sun goes down the bright lights of the vehicles and the shutter speed no longer allow this to work. So night-time LPR (license plate recognition) will need much more expensive gear.
The forum won’t let me put two images in my post, but here’s how the same angle appears on a Nest IQ with its normal wide angle lens and the image quality set on [High]. Yup, the Nest IQ and Wyze v2 are mounted right right next to each other.
The on-coming white SUV you see in the first picture is the same vehicle as this image from the Nest camera. By the time the SUV gets closer to the Nest IQ, it’s somewhat perpendicular to the camera and there’s no way to read the front license plate.
Thanks to users like cwalmquist and Siegelracing who had linked information in some of the other threads here!
Here’s the other thread about the topic… but it got a bit side-tracked with pictures of chickens haha.
Haha, I just saw jrodricks posted this same premise (although for monitoring a swing) yesterday!
I wish you luck cause reading the tag on a moving vehicle is tricky at best. Perhaps the 25mm will do the trick, but I’ve had close to zero luck with normal compressed 30 FPS cameras, muck less these 10 FPS at night cams.
Maybe it’s the angle of my Wyze or it’s the high contrast of California plates, but almost every day-time license plate is legible with this setup. You can click the images I linked and see the full view.
I waited a month before I posted this thread because I thought maybe I just had a few flukey plates that were clear, but maybe the vast majority would be blurry. I was pleasantly surprised at the clarity of what this Wyze was able to record in daytime.
The speed limit on my street is 25 mph, but cars usually go 30-35. Whether cars are coming toward the camera or driving away, this setup records their license plate with great clarity.
Granted, I didn’t dismantle a Nest IQ to try this out, maybe it’d look even better on that Nest. But that camera is like $300. The Wyze v2 hardware encourages experimentation, and it’s delivering some great clarity on moving vehicles with this lens.
Yes, I know some thieves are driving around with stolen plates or fake dealer plates. It’s easy to type some fake numbers on paper and make a fake plate that resembles the temporary plate that you get when you buy a new car.
But overall Wyze customers can relatively easily set up outdoor video surveillance that actually has a chance of identifying perpetrator license plates (at least in the daytime).
I read years ago that with so many traffic cameras capable of reading license plates, California motorists’ plates are identified automaticaly, on the average, twice a day.
Yeah, I see some out of state plates on this camera, and usually a bit harder to read. Some states have custom plates that are literally a light blue background with dark blue letters. Or some plates have these wacky photos and flags all over it that span the background, and they basically render the numbers illegible. I don’t know what the respective state DMV is thinking sometimes haha.
For California, all tollways near me are now just linked to the license plate, and they’re even adding those express lanes on the freeway. So you pay toll linked to your plate for the privilege of using the HOV lane. Even if you have multiple people in the car you need to register your plate to your transponder to use the HOV lane without penalty.
Anyway, the moment I actually record something useful with this Wyze, I’ll let you all know
I’m running into the same problem myself. I’ve just placed a wyze cam on the garage but viewing the video footage there isn’t a single frame where I can make out any of the characters. I had just convinced family that it would do this since its a home that isn’t always used. We have already purchased over 6 cameras for this summer home and certainly don’t want to get a different camera source since does not have a camera with a zoom or clear enough to see tags. In the cars in question are ones that come up the driveway and are only 20 to 30 feet away which I honestly thought would be close enough for the camera. Virginia tags are very clear dark blue on a white background, so that’s not the issue. I only wish there was an adapter that could be placed over the existing camera, like the clip on lenses for your phone. Like you said the price does allow more hooligan tactics and I’m happy to do so. But, the instructions you placed were not clear enough to follow. Might you have clearer instructions, photos, or video to add more assistance to other tickerers that would like to pursue such a task? instructables.com type forum/platform would be a good place as well.
This is a good break down video for the cam but this guy doesn’t touch the camera or lens. Is it just unscrewed and the new one that you linked to get screwed on? Also, you mentioned the camera needing to be configured before dismantle. What do you mean by that? With those two questions answered I may be able to figure out the rest. I’m ordering the lens now and hopes I can follow your instructions to success. I’ll post update when I can.
Yes, VERY IMPORTANT to set the cam up on the WiFi you want it on, and on the Wyze account you want it on, because the only way to do this is by reading the QR code, and once you swap out that original lens, the cam won’t read anything close any more.
Best to also take photos of original lens before removal to count exposed threads so you can duplicate it if/when need to put old lens back in to read QR code again - like if you ever want to change your WiFi password.
So what I did was this - follow below to quickly remove black front plate from cam.
Remove power from cam first!
Obviously skip the “remove mic” part and take pics of lens threads instead.
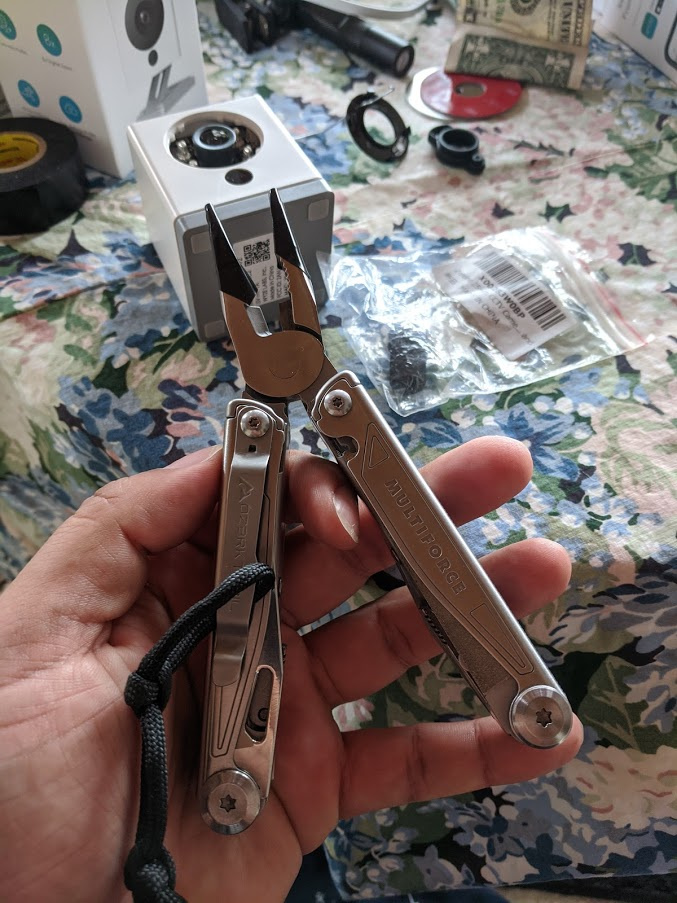
Then I took regular slip-joint pliers and wrapped electrical tape around the jaws so they wouldn’t mar the lens.
Then I grabbed the lens and unscrewed it and screwed in the new one. It may take some fidgeting depending on how much residual glue is on the cam. Just be very careful and gentle so as not to cross-thread the new lens.
Once it’s in, plug the cam in to power it up and begin trial and error focusing on a distant object until you’re happy.
I wrapped some electrical tape around the new lens threads before replacing the front panel to help seal out dust.
Even after full reassembly you can can still adjust the focus by turning the lens with fingers or pliers.
Will try to remember to take photos on the next one I do!
Thanks for the super quick reply and of course the details. “Configuring the cam” certainly makes more sense now. Taking pics for thread count is a great idea! Also in regard to the QR code scan with zoom lens. I wonder if uploading the webcam script would assist in getting it configured, maybe. Hopefully, I won’t need to do that. Sadly, that’s another rub with these ip cams, the inability of changing network settings remotely. A simple admin login feature would be great. I love electrical tape but it tends to be a bit thicker than plumbers tape it sounds like there a decent gap there?
Anywho, when I get it in I’ll knock it out and add any details or hiccups I came across. Again, thanks for the very quick response.
If you mean the webcam firmware, that’s a whole different kettle of fish, but just might work great. Basically using the special A-A USB cable to link it to a PC and then running a 3rd party Windows program like Conta Cam to turn webcams into a webpage of surveillance cams. I have only used ‘real’ webcams for that and would be interested to hear how the Wyze cam, esp with zoom lens, works. I like the idea of an internet free, hardwired Wyze cam surveillance system.
Agreed! And as they say, “there’s a thread for that” - you can vote here:
Since the zoom lens is longer, it sticks out of the housing and the gap is the difference you see in the lens photo between the threads and the outer diameter of the lens. Yes, whatever tape or substance that works! Ideally I would like to hear about the best way to do it such that the V2 Zoom could be safely used outdoors under an awning like so many use their stock V2s
I have one Wyze V2 with the 25mm lens aimed through a window down a lane and I can read plates from the images at about 140’ or so. Important thing is what they say in this article below about choke points and camera angle, etc. My vehicles are moving slowly (7-10 mph) straight toward / away from the cam and generally only one at a time. Trick is that the 12 sec motion clip is often triggered out of reading range, so need to look at the continuous recording on the SD card to get a good still of the plate when the vehicle is in the right spot. Also all daytime work.
Edit - the 140’ distance is absolutely optimal “golden hour” sunlight conditions and good weather!
Well, I gave it my old college try, procrastinate and try to get it all done before the test! Argh, it bit me in the arse this time. I know how to use a screwdriver and I know how to avoid cross threading for the most part. But, this little lens wouldn’t let go with my Ozark cheap but nice quality pliers.
So I had to enlist the help of some channel lock pliers. I now had the parallel grip required to keep the pliers from slipping of the round and slippery lens head.
One good snug and twist and I finally broke the old lens lose. Finally removed I removed some of the malleable glue residue left over from the old lens. With the softest of fingers I rotated the new lens counter cw awaiting the satisfying sound of the lead thread dropping. Only thing is the new lens is metal and the female portion is plastic so no satisfaction had. After a few resets and a plasticy drop I went forward and attempted to send her home. Nope, 2-3 turns in the new lens started wandering south. I retried a few times but the cross thread / damage has been done.
One wyze cam down and no way to rectify the current issue I’ll have to try again with a new one. Oh yeah trying to place the old lens has the lens dropping while screwing it in as well so she’s ruined for now.
I’ve wondering if I drill out the old threads and just super glue it into place? I think that may be my only way to correct this issue.
Also, anyone know the best method to replace these lenses to avoid another cross thread disaster?
Now ya know why I/we took them apart. But all is not lost. For one, take it apart and try to rethread with the new lens. I had a couple that were cross threaded an manage to finally get them all threaded straight. Or you could just pick up a few new lens mounts to replace the one you cross threaded. But either way, if my experience holds true, 6.5 out of 9 will die withing the first 3 months anyway.
Oddly, I was able to get the old lens back in and to focus correctly. So it’s not ruined but the zoom lens is floating on the table of shame! I’ll try again tomorrow when my luck will surely be much better
Hmm, now how are the mounts secured to the PCB? I’m guessing you’ll have to take the whole puppy apart at that point.
Well, that’s pretty specific you happen to be an actuary or something. Anywho, I think I’ve littered two houses with these lil boxes and they are still hanging on after ~9 months, 10 out of 10 are still kicking just fine. I wonder if dissection as a daily task may warrant its early demise?
The only connection to their demise is the wifi they’re on, or rather, not on. Most of the loses, 2 within 1 minute of each other, were connected to a old Linksys 54g running DD-WRT firmware, and the other was on a secondary TP-Link 1250. The 2.5 that survived so far are on a cheap Trendnet I use for the router as well. The “.5” part is a pan cam for which the RTSP no longer works. Which they are/were all on RTSP firmware, and once they died of wifi scramble, could not be, or it made no difference to revert back to the standard firmware. And once I figured out that Wyzw is nothing but a marketing company for cheap Chinese products, I went looking somewhere else for a higher quality cheap Chinese cam.
I haven’t really messed with routers since the old linksys and their hack-able brains.
Well, you’ve certainly given me pause for this company. I’m sure I’m not the only one hoping that they can
keep these cheap cams competitive with the rest of the market. I certainly wasn’t too happy to find out the outdoor cam is not recommended to stay on a power source. I was thinking a small solar panel could easily keep it going indefinitely with a dc2dc keeping it just under full capacity. But, I guess other tinkerers with these in hand will have to prove to us what these can do
[quote=“mathelm64, post:16, topic:85898”]
higher quality cheap Chinese cam
[/quote],
That used to be an oxymoron, But the way those folks tinker about and have markets upon markets on recycled PCB bits and goodies and are able to create very good knock offs of everything including iphones and other phone flagships, save OnePlus, its no wonder folks like Wyze and Lectric take on a very well established industry and just throw a friendly white face in-front of it and act like they’ve discovered something new and awesome, I’m looking at you, you murdering Columbus. Let us know what tribe you decide to move onto, that is if the Wyze underground doesn’t take you hostage,
I used some electrical tape the old channel locks to power the lens in then rolled out to the driveway and walked my butt far enough to gauge where I wanted the focus to be. I realized very quickly that this lens has a very narrow angle and its depth of field is shallow as seen in the photo: The subie is a wee bit further away than the prius, yes we’re tree huggy, but the depth of field is acutally pretty good.
The tags are actually pretty clear from 30 to 50 feet away not too bad. Sadly, we will have to keep 2 cams out on the driveway since this is too narrow for our purposes.
I’m so happy to post this though. Not crazy when something seemingly easy kicks my butt. Hope this helps other folks to try this out as well. I also seriously was going to ask/pay Sodcam to prep the cam for me since forcing it on with the channel locks seemed counter-intuitive.
Welll, I was all for removing the stock lens with channel locks… the re-installing… well whatever works!
Actually I have another lens to mount right now and it is resisting - no amount of fidgeting seems to make in go in straight yet - so maybe I’ll take a hint from you and use the BIG pliers after all…! (I did read somewhere that the quality control on the threading of some of the zoom lenses is less than stringent )
But seriously glad you got it working! These zooms have been doing great for us!
You are exactly right on the narrow FOV and shallow depth of field too. I’ve really gotten into the “choke point” concept - aim it where a car has to go and have continuous SD card recording on. They detect motion events quite well, but often the perfect focus on the plate is a bit before or after the 12 sec clip.
And yes, right next to every zoom is a “normal” V2 to catch the big picture. Even so, it still a lot cheaper that the commercial systems and does all I need for now.
There was a ton of rain here this past week and the PIR driveway alarms were as blind as the Predator looking for Arnold in the waterfall, but the zoom lens cams came through! Luckily, the iDevices were giving alerts in a very timely manner.
I was going to give up til I read mathelm64’s reply, gave me the budge I needed. When he linked a page to the mounts for the cam it made it my mission to complete this task. I also pondered if someone dremeled through the mount save the base, that seems to be screwed by 2 screws, that we could open/span the mount and let it close on the lens. But, this would also require taking all the guts out which is just too much trouble. Again, very thankful that you showed us how to remove the lens without all that hassle. Now I’m just waiting for the weatherproof case and a new 32g and I’ll slap her up there with the current wide angle lens.
Oddly, I’m using 50lbs fishing line to keep that up on the garage. The house is all cedar and it would break my heart to put holes in her. So I used the “ribbon curling” method on the fishing line to create a hook in the line and then I “fish” it through the overhang vents and through the screw holes in the base. a 4 turn overhand knot holds it up against the vent then a second 4 turn OH keeps that taught. I love knots but this is the simplest knot I could think of that wouldn’t require my shoulders to explode and could hold enough tension before cinching it up with a second iteration. I just learned the Blake’s hitch knot that arborist use for ascending which actually holds very strongly when dressed up correctly on test line. It holds this friction hitch taught enough to have my hands to call our mercy! Its a PITA when putting it together on the sofa in test line. I would lose my mind trying to create one on a ladder with shoulders screaming at me, I’ve been doing burpees lately(not just plain weakness ). I’ll upload a pic here tomorrow if anyone wants to see.