I know this has been discussed before, but “Mike C” has published a new " How To" Youtube video on how to increase the useful distance between your Wyze Cam and WiFi router. There are also some older Youtube videos on the same topic
6 Likes
Nice, thanks. I’m really worried about that cable (with heavy rubber duck now attached) unplugging again though.
Other videos feature various antenna mounting methods.
1 Like
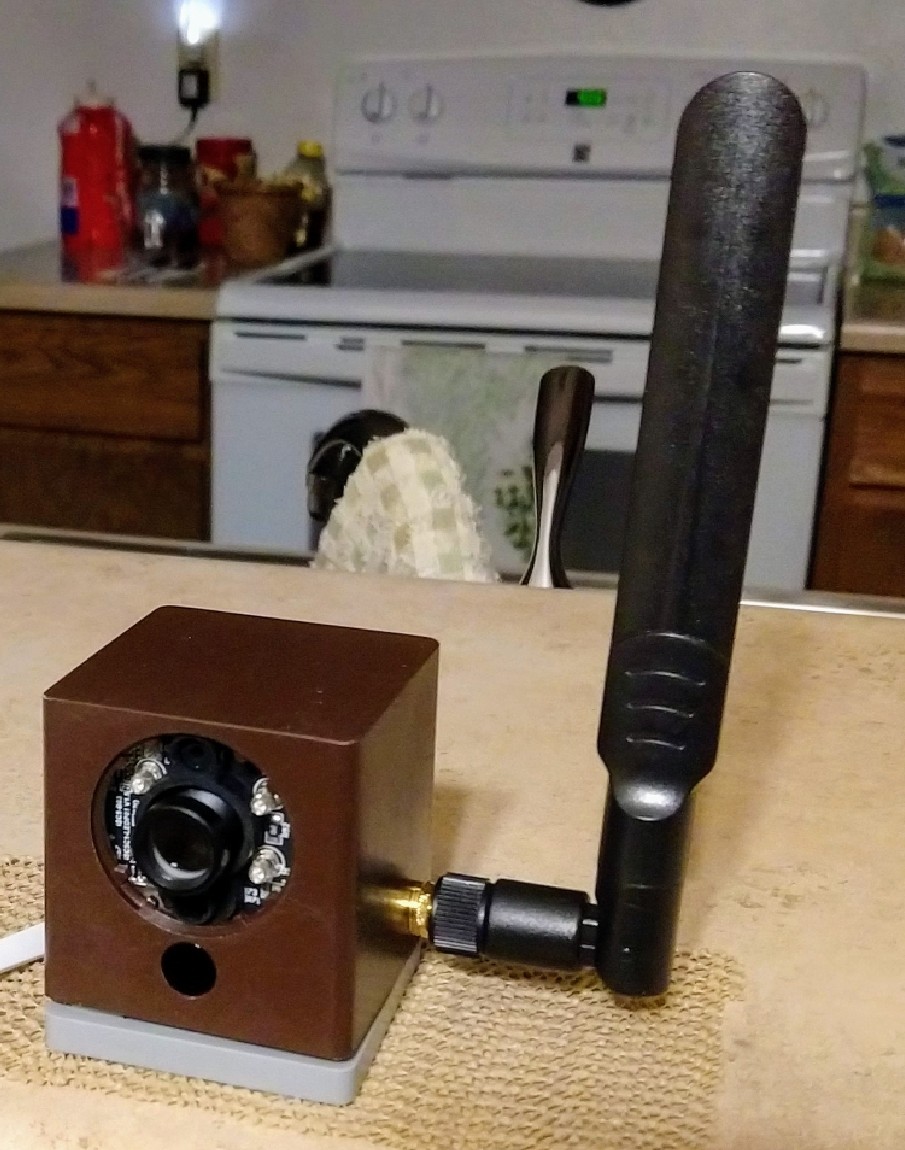
Just drill a hole in a very exacting position and mount the antenna, taking into account the fact that when you snap the back of the case on it has some protrusions to avoid. There’s another user in the forum who posted measurements for a hole. I think it was about 16mm from the back and 13 mm up from the base where you need to drill the hole. I plan to put this FrankenWyze outdoors and spray-painted it to match the wooden trim where it will be placed. I put a 25mm lens in this camera. Video links below are for a standard camera side-by-side with the 25 mm camera, mounted indoors looking out of second-story window.
4 Likes
Do you have any idea as to what your maximum range is from your WiFi router using the external antenna?
No, I should have done some sort of distance testing before mounting it rather permanently. I’ll theorize that since a network analyzer app on a smartphone indicates a decent signal strength, around -60dbm, as I walk 80 or 90 feet away from my condo, then my wild guess would be that an external antenna on a Wyze Cam V2 would work okay at a somewhat greater distance. The Wyze internal antennas are tiny, relatively fragile, and as I learned, the hard clumsy way, easy to break the wire off at either end.
So if it’s only “somewhat better” why would you go to all that trouble? Just curious.
My wife would say I don’t know when to leave well enough alone! When another user posted screenshots of their telephoto lens installation, I just had to try it. Technology addiction and lifelong fascination for cameras. I like to build a new PC from scratch every few years, and read about all the latest electronic gadgets which I can’t afford. I’m also active in my HOA which is a modest 16 acre property with 23 buildings and an inability to afford the CCTV system which they really should have in place due to occasional theft and crime. Neighbors are increasingly interested in putting cameras in their front window to focus on certain areas so I thought I would try to determine how helpful Wyze cameras might be when equipped with a telephoto lens.
2 Likes
Thanks, makes sense. I would point out the obvious, though, that the telephoto (which seems to be doing a very nice job in your test) is severely limiting your field of view. I think you’ll want to check out the higher resolution 2K and 4K cameras, or at least the PTZs that will follow motion for you.
Motivated by this discussion, I took two identical V2s running the latest firmware and converted one to a replica of your FrankenCam - except that I left the back speaker off instead of drilling the case, and just taped the antenna to the side of the cam.
Now I am testing them for usable distance and the test tonight was inconclusive.
I put both cams about 60’ from the router, magnet mounting them to the top of my outside metal power meter box.
In between are one brick exterior wall, five interior walls, an upright freezer, a fridge and miscellaneous cabinets & furniture. Signal strength as measured by the apps linked below is a mighty -84dbm.
Using both Android and Apple devices (WiFi only, on same LAN) as viewers, both cams actually worked about the same and streamed in HD - often around 100 KB/sec.
The viewing devices were definitely not happy in the same location as the cam, but were actually functional when closer to the router.
Loading and connect times were slow, but felt very similar, people walking in front of the cams looked about the same, etc. No extra SD cards ready to test playback and did not test alerts, etc - just live stream viewing.
So the weirdest thing is that in the Wyze app, both cams ALWAYS showed three bars of signal strength?? Is this a fake reading, or what does it take to knock them down to one or two bars?
As soon as possible, I’ll take them to a different location where I can get some more obstacles and greater distances happening…
https://play.google.com/store/apps/details?id=com.pzolee.wifiinfoclassic&hl=en_US
Thanks for posting those excellent comparison videos! I’m trying to monitor vehicle traffic on some long lanes (700’ to 1300’) and they convinced me to go ahead with the swap.
I presume this below covers what you did?
https://www.amazon.com/Camera-Million-Security-Firefly-Cameras/dp/B07MNT1ZK2/

In what scenario could the following idea be of value to someone? Routers can be piggybacked via Ethernet cable. There are articles online about how to do this. Basically you take the spare router sitting in your closet, turn off Wi-Fi on your laptop, plug the router into the laptop, and go to the administrative hub 192.168.whatever and disable DHCP and set an SSID and password. Probably then turn off the old router, or child router, and connect it via Ethernet cable to your primary router. I suppose you could use the same SSID and password for the child router as the main router, to avoid having to reset and reinstall cameras that were used in conjunction with the main router.
An acquaintance with a mountain cabin and satellite WiFi has an available electrical outlet outdoors, maybe 200’ from the cabin, just out of reliable WiFi range. And some POE adapters. The thought we’ve had is along the lines of running 200’ of Ethernet from the main router to the child router, and use POE adapters and ethernet cables attached to the child router to power several cameras sheltered in the trees.
How stupid would this be?
Not stupid at all. We’re looking into something similar for some barns.
The biggest danger when burying long runs of cable across open fields is apparently lighting strikes. Gotta make sure everything is properly grounded and surge protected…
Yes, the lens used is the same, pictured below.

Be careful not to accidentally reset the camera while disassembling. The brass connector on the Wi-Fi wire lifts straight up, perpendicular to the circuit board. Don’t stress the soldered end of the WiFi wire or you’ll break the soldered connection. Carefully consider using a q-tip to apply some rubbing alcohol or a tiny amount of fingernail polish remover to the hot glue that’s on the threads of the lens. I used a dental pick purchased at a surplus store to scrape glue off the threads. When you have the circuit boards and lens removed from the camera housing, pop out the large black ring around the lens. Then you can adjust the focus easier. And snap that ring back into place later when it is confirmed to be working. Magnetize your screwdriver because those screws are teeny tiny. On the first circuit board you encounter, I think there are four screws. I think if you only remove 2 that go into white plastic then both circuit boards will come out together. In other words, initially ignore two screws that pass-through brass grommets. There is a large rubber grommet around the lens. It got away from me when I was disassembling and I’m not entirely sure that I oriented it properly when I reassembled. Removing the glue from the threads on the lens was a pain. The new lens will stick out further than the original lens when you’re done, probably not a big deal if sheltered okay. Getting the back of the case to unsnap was probably the greatest challenge for me.
2 Likes
Finally found a video illustrating these cameras and power over ethernet.

5 Likes
No. You need knowledge of half wave and quarter wave signals to do that. It’s not like putting aluminum foil on Rabbit ears for better reception on TVs in the 60s