I live in a small shotgun type apartment. I’m looking for unique uses and installations for the wyze sense products. My camera is set up to cover over 3/4 of my apartment area so I’m having trouble finding uses for the wyze sense accessories without being overly redundant. What are some unique and creative installations that you have done to utilize the different products within the wyze sense family?
1 Like
Mailbox notifications, washer/dryer finished, medicine/liquor cabinets, I saw a poster used as toilet seat up/down notifications, fridge/freezer open, garage door open/closed. If children are present, maybe a cabinet where cleaning supplies are stored. Just a few thoughts and things I have tested, except toilet seat.
1 Like
We use it in place of our Ring Doorbell Pro. Using the sense closed switch you can modify your doorbell so that clicking the doorbell triggers the switch. With 2way communication, I can easily greet my guests since it takes some time to get to the door. Next, I’m hoping to use sense to toggle state on my mag lock. So much better than Ring in every aspect.
1 Like
All interesting and useful applications, especially the toilet seat. However, let me supply some more info about my living arrangement and accommodations. I live alone, laundry room is not in the unit and is used by the other tenants as well, and parking is in an open lot behind the building. Whether the toilet seat is up or down is not a concern, in that maintaining marital bliss is not an issue. lol
I mount each of my Motion and Contact (the wide part) sensors on the face side of a small piece of plexiglass using the mounting adhesive strip supplied with the sensors. This makes a strong bond of the sensor to the plexiglass, and allows me to read the product info on the back side of the sensor if I should need to do so. Then, I use a 3M Command Strip between the back side of the plexiglass and the surface for attachment. This allows me to remove and re-install any sensor by breaking the bond on the Command Strip without disturbing the Wyze mounting pad on the sensor. The sensor always remains attached to the face of the plexiglass with the Wyze-supplied foam contact adhesive strip. An alternative to the Command Strip is velcro.
And, if you are testing different locations for sensors prior to making a “permanent” installation, you could make a temporary attachment of the sensor using painter’s tape.
2 Likes
Did you Cut the small pieces of plexiglass To size yourself or Buy them as is ?
I made pieces from leftover panels of one-eighth inch thick plexiglass from another project. Each piece is 30-32 mm square which allows a margin of plexiglass to extend around each side of the sensor. And, that margin allows me to pry the plexiglass base off the moulding with a putty knife and not damage the sensor case. Any fine-toothed saw that can be used with wood (backsaw for moulding work, hacksaw, Japanese pull saw), can be used to cut the plexiglass to size. The, I use a fine file to dress the cut edges.
2 Likes
I have ways to cut plexiglass, Scroll saw for small pieces . Like you said hand tools will work also
Sounds like a good idea , Thought I would ask for other people also.
You could use this same idea to screw Mount The sensors
Okay, with the added info, if car is parked close enough, also if close enough, a storage door. This is in addition to the more obvious, windows and doors.
You don’t mention what other connected devices you have so here’s how I used the motion and open/close sensors with IFTTT and my Hue lights:
Kitchen and Bedroom: Motion sensors. I created a Hue scene for each room; one for when I walk in the room that turns all usable lights on, and one that when I walk out, only one lamp remains lit at a very dim setting. I get a 2 sec delay, but it is quite functional.
Bathroom: Open/Close sensor. When the bathroom door is closed, all lights turn on and are bright. When the door is open, one light remains lit at a very dim setting. If I had a smart vent fan, I would configure this to turn on when the door is closed and off when the door is open.
I have an additional Open/Close sensor that I think I will place on my dog’s kennel door to activate and deactivate the camera I use to watch him when I am away.
Hope that helps!
2 Likes
i was so excited to use this on my mailbox, then when i went to install it and because my mailbox is metal it would not work, If anyone knows a workaround i would love to know. i even tried the motion sensor and it didnt work in the mailbox either ![]()
1 Like
It might not work in the metal mail box
Some people have been able to increase their signal strength by adding a short Or even 3 foot Cable To the back of the camera And then On the female end Attaching their bridge there
1 Like
I brought the camera with the bridge outside just to see if signal strength was the issue, but it still didn’t work inside the mailbox. I even tried the outside of the mailbox, but once it made contact with the metal it stopped working. The signal is fine because i can stand next to the mailbox and hold the contact sensors together then apart and they work.
You could try extending the antenna like this guy did and route the wire outside of the mailbox where it won’t be blocked by the metal:
2 Likes
I’d attach the small part of the sensor to the bottom of the mailbox door and under the mailbox I’d attach the larger part of the senor so that when the door is opened the sensor registers a closed circuit (open mailbox door). You’d then want an alert for when the circuit changes to a closed state to know you have mail. With the sensors on the outside, yet pretty weather protected, I’d think that it’d work.


I have other ideas on my channel like how to get doorbell notifications for a dumb old doorbell or a button.
1 Like
I mounted mine in the door and door jam. For anyone interested, here are the steps I followed and pics. You will need a 3/8" drill bit and drill, a business card or small piece of cardboard, a hammer and a chisel (no wider than the sensor), and either a steady hand or a depth stop collar for the drill bit. To do all this you need to remove the double sided tape from the sensor pieces.
-
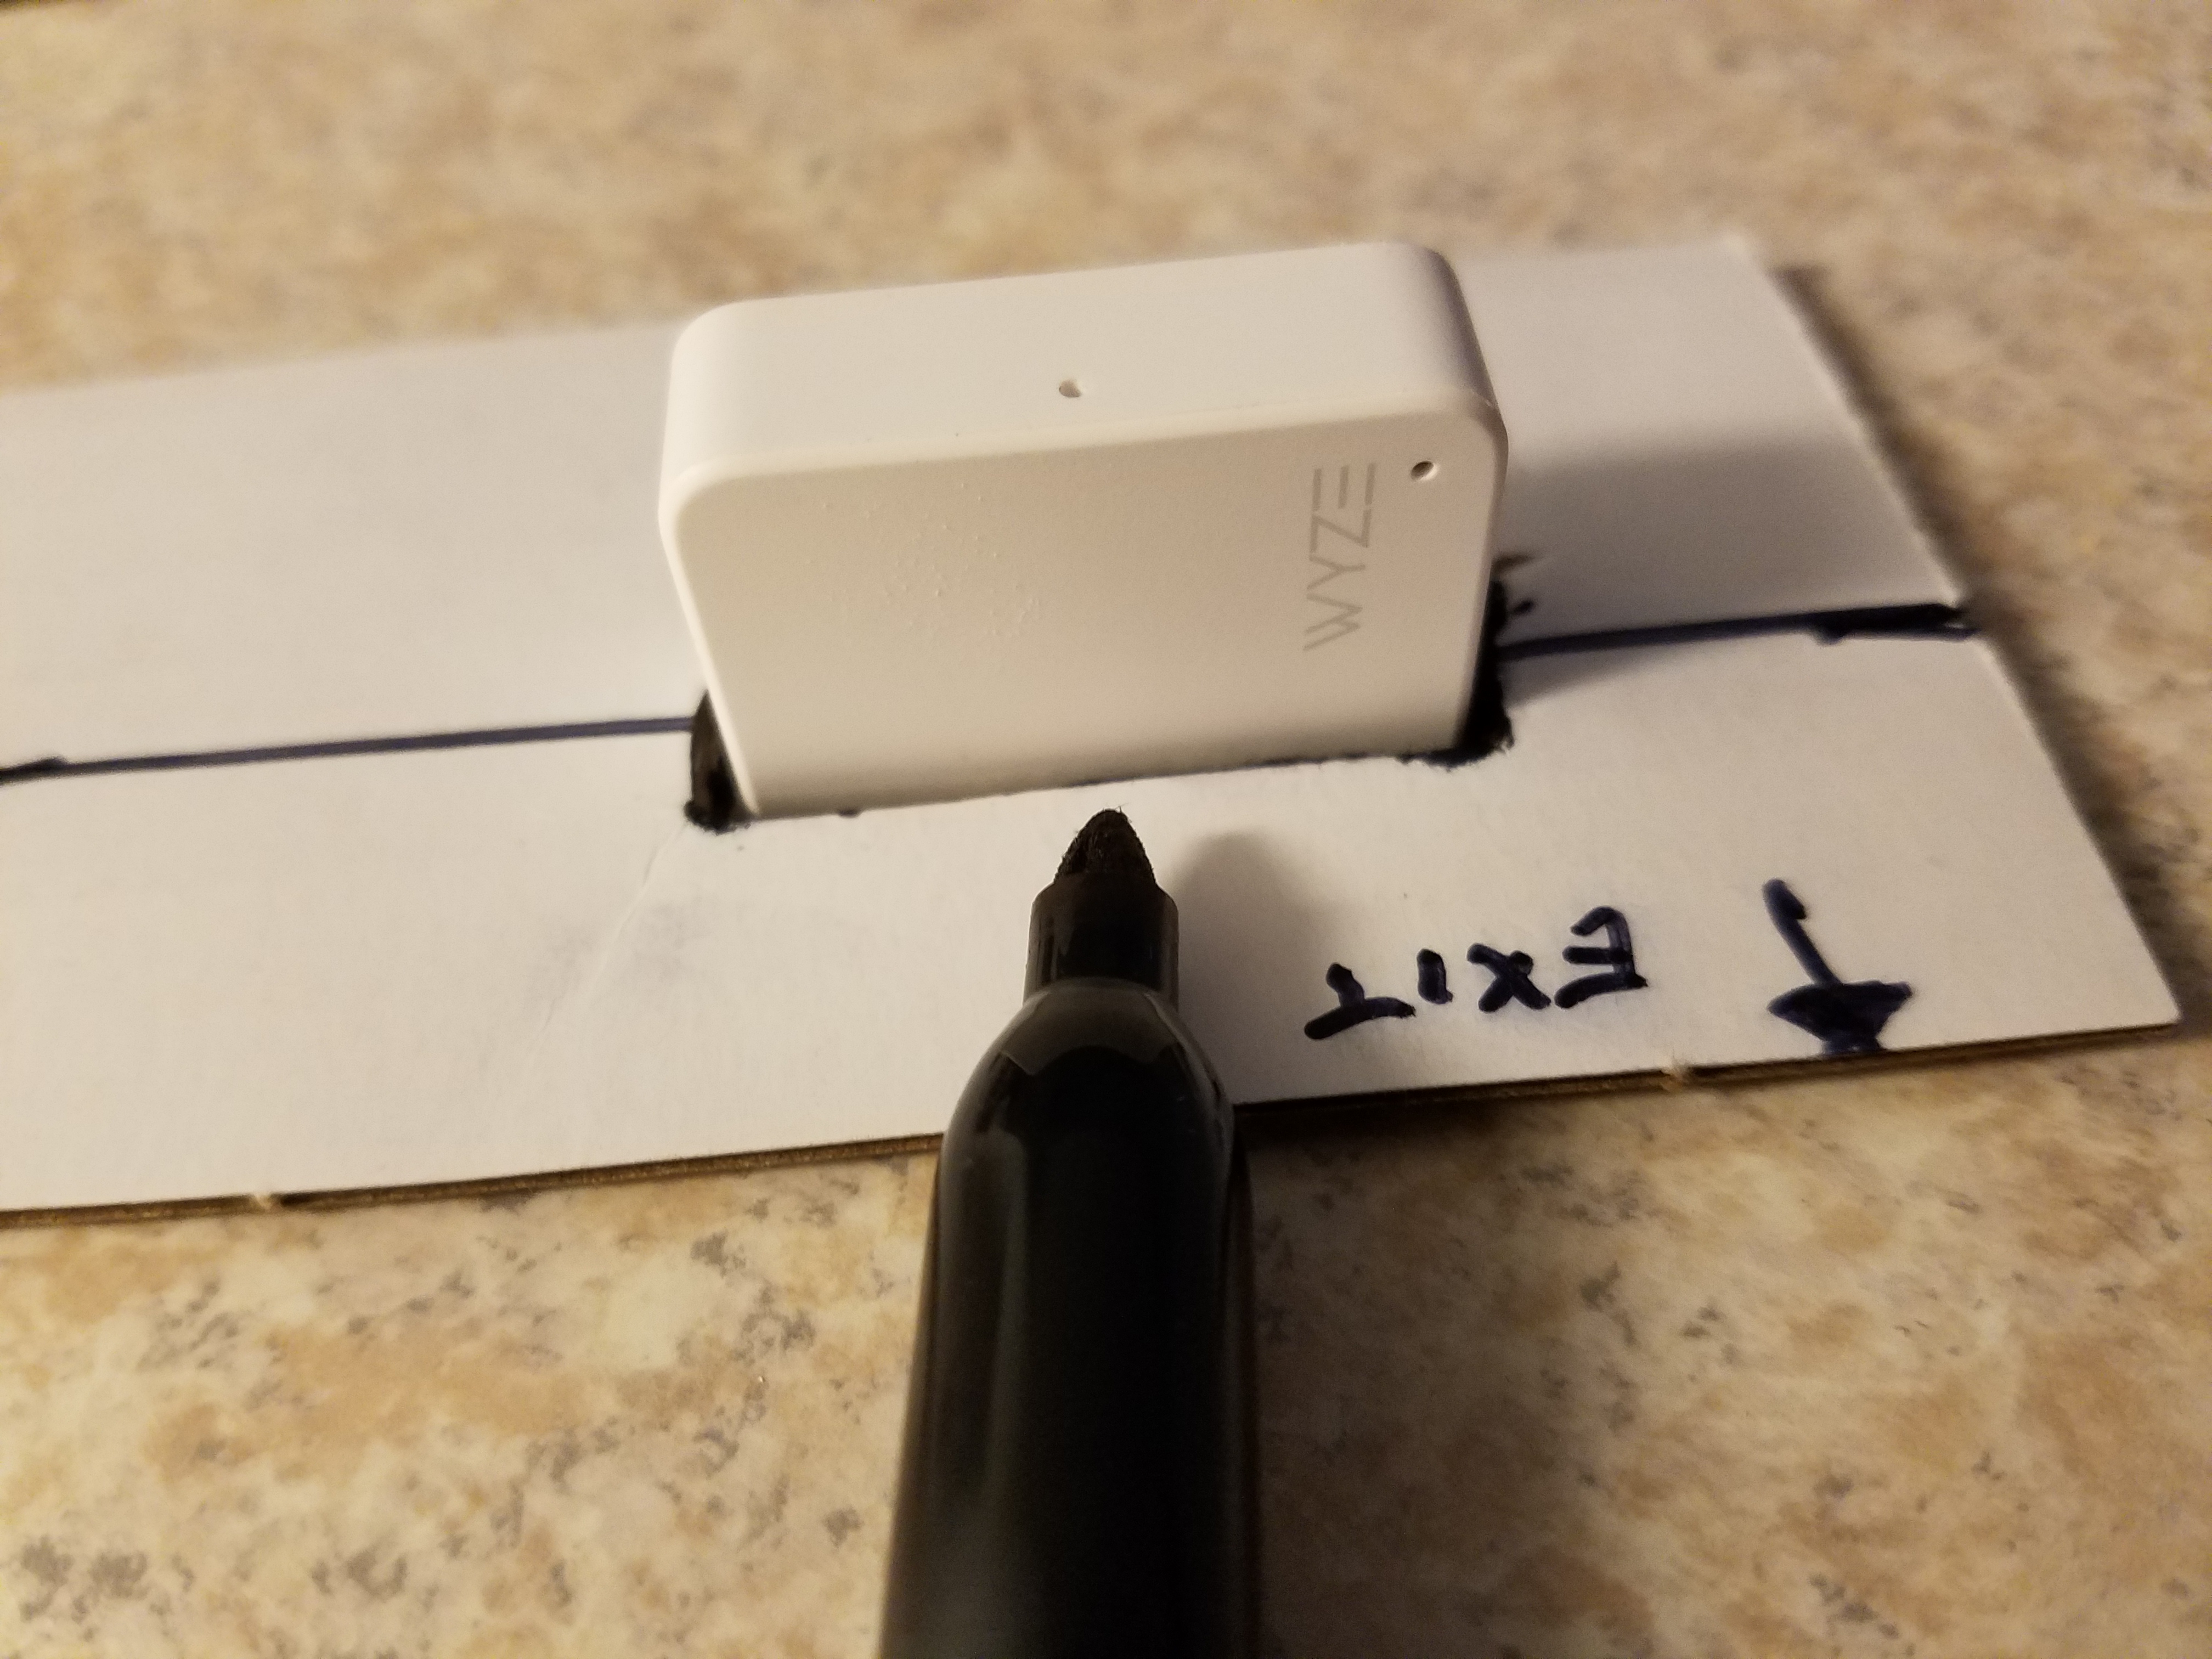
First, I got a thin piece of cardboard about the size of a business card, thick enough to stay flat (don’t use paper) and as thin as possible (maybe a business card would work too).
-
Place the cardboard template on top of the door, draw an arrow towards the exit and one towards the inner door jam where the latch is. Flip the cardboard and just put the arrows in the same place on the same sides as the top with the same names (jam/exit). This is important that both sides of the cardboard are identical.
-
Line up the card so it’s flush with the exit and jam sides of the door. Make a tick line halfway between the exit and entry side of the top of the door on the cardboard. Use a straight edge to make that line straight across the template cardboard. (I did all this at once so my template is already cut out in pics)
-
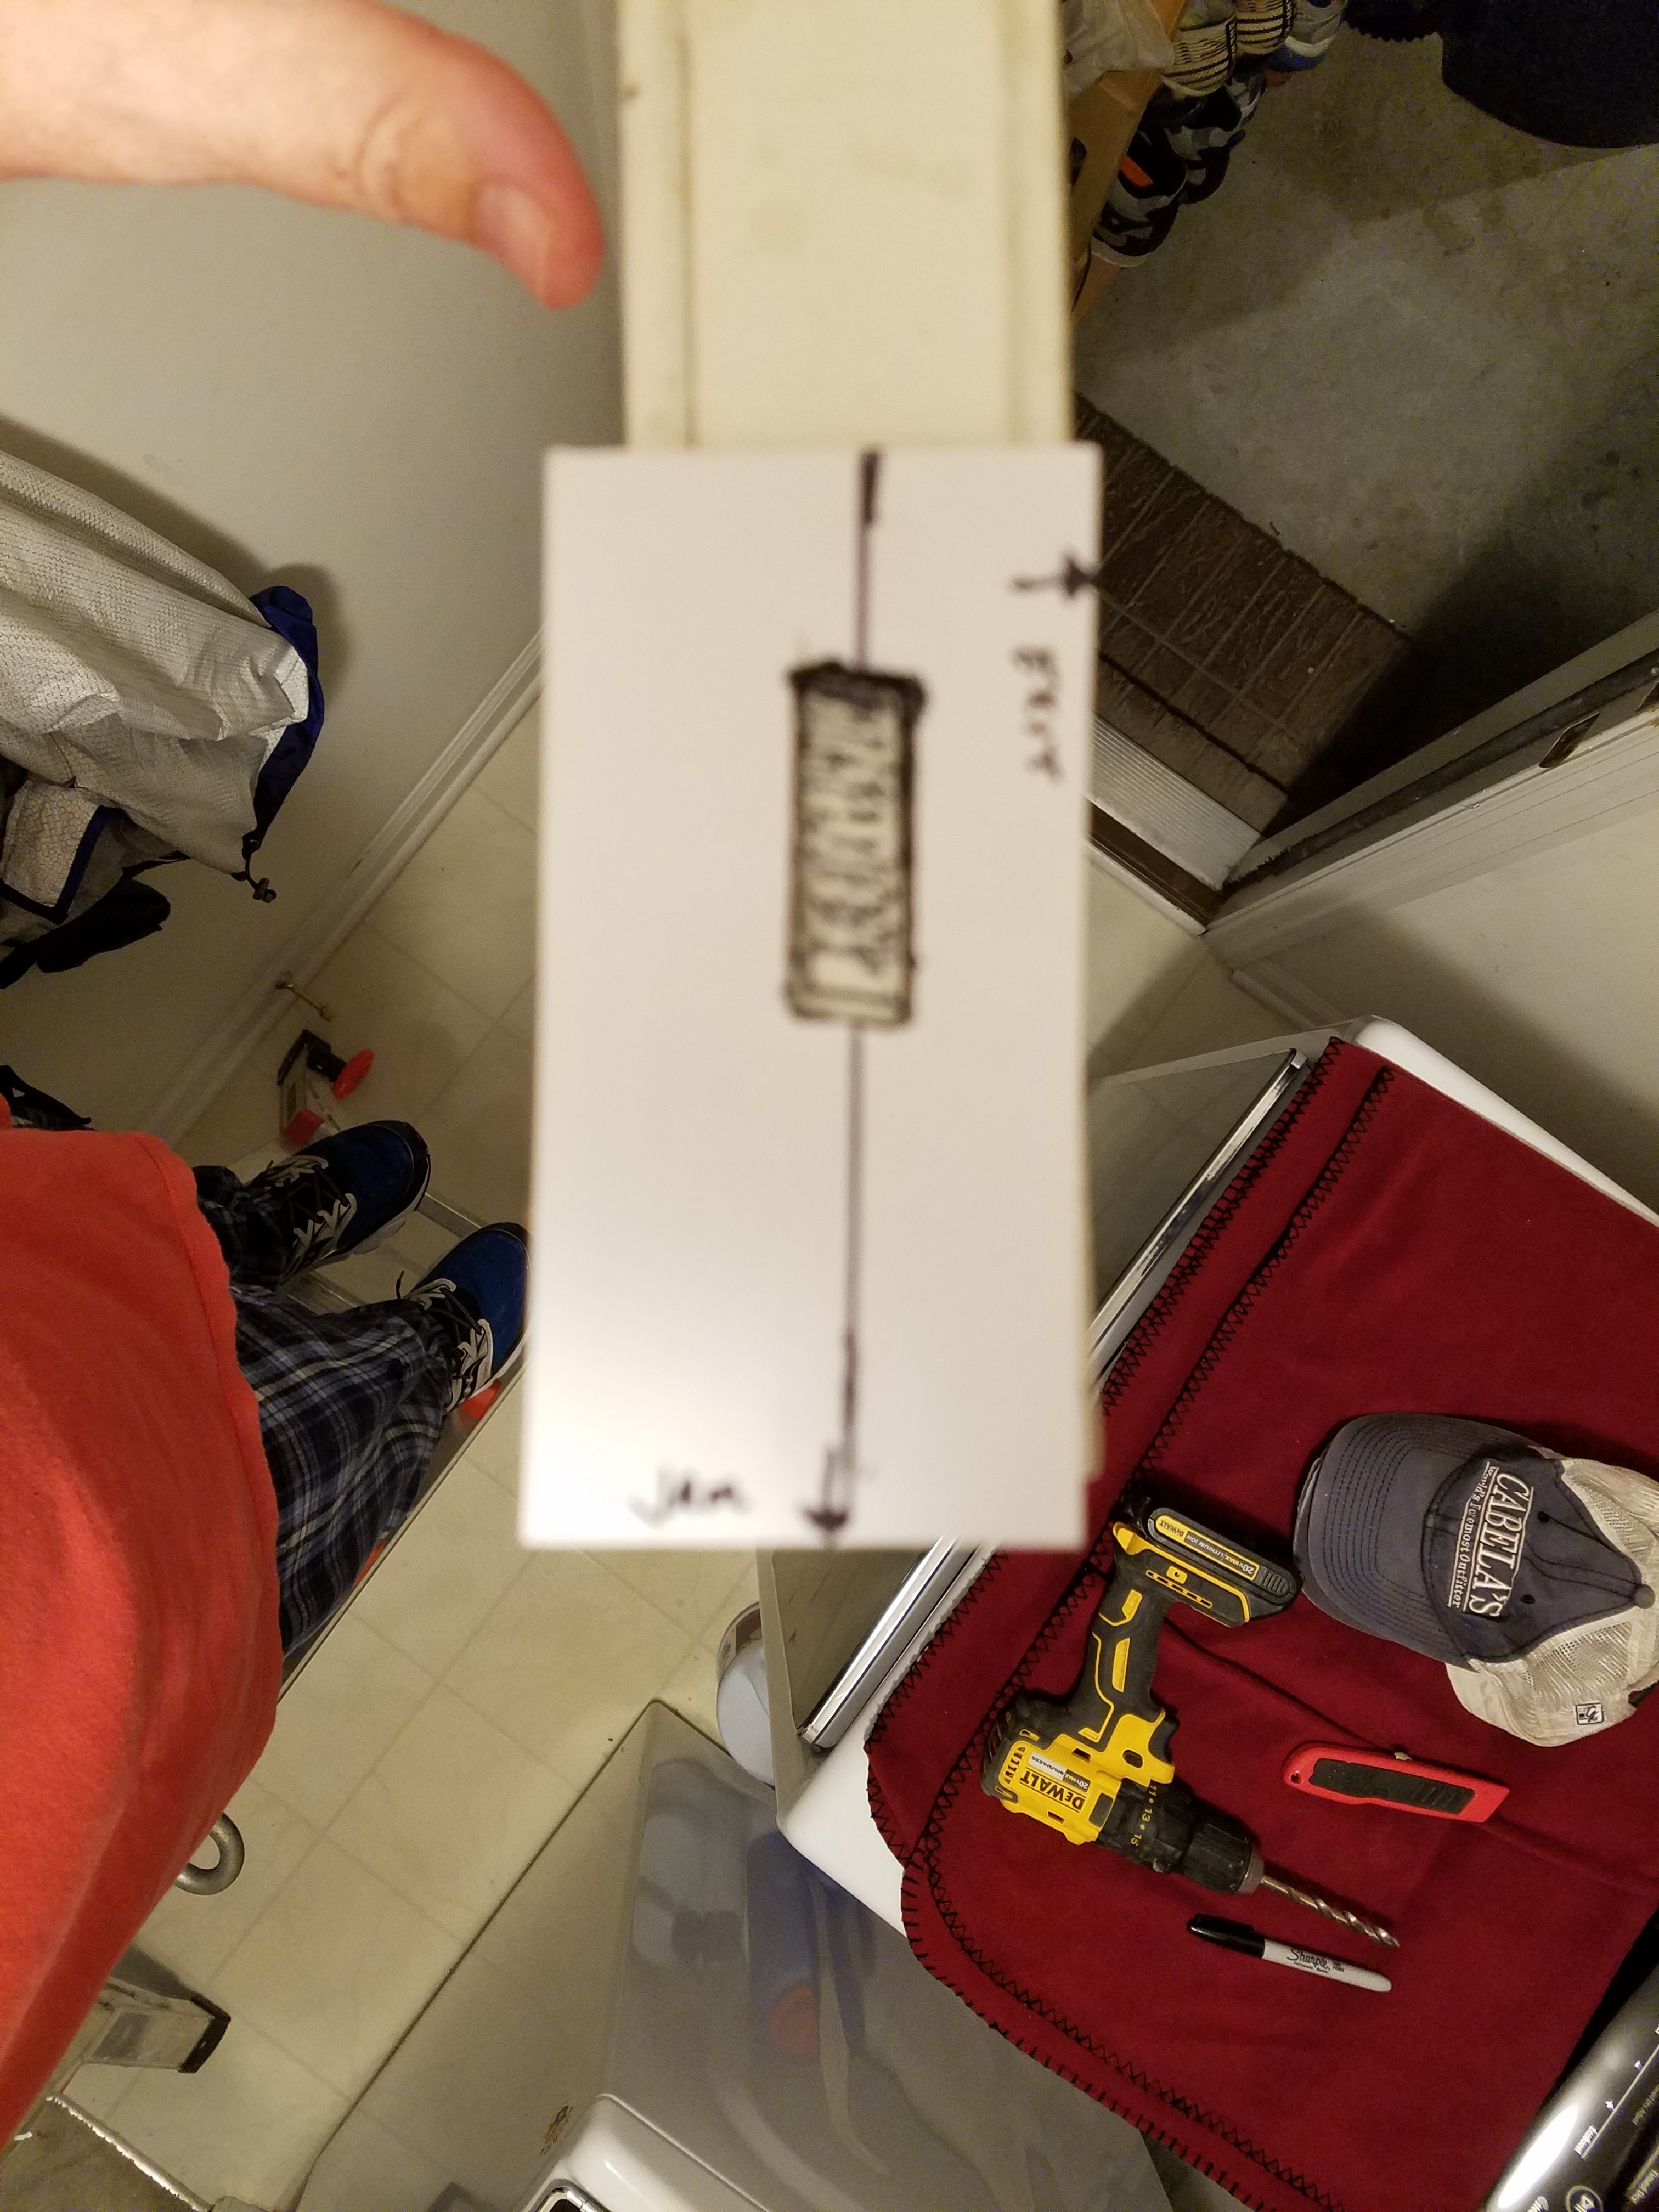
Place the flat side of one piece of the sensor about an inch or so from the jam side of the door. Draw the outline of the sensor as shown. Cut out the sensor template hole with an exacto knife or utility knife. Put something underneath that can be sacrificed so you don’t damage something valuable.
-
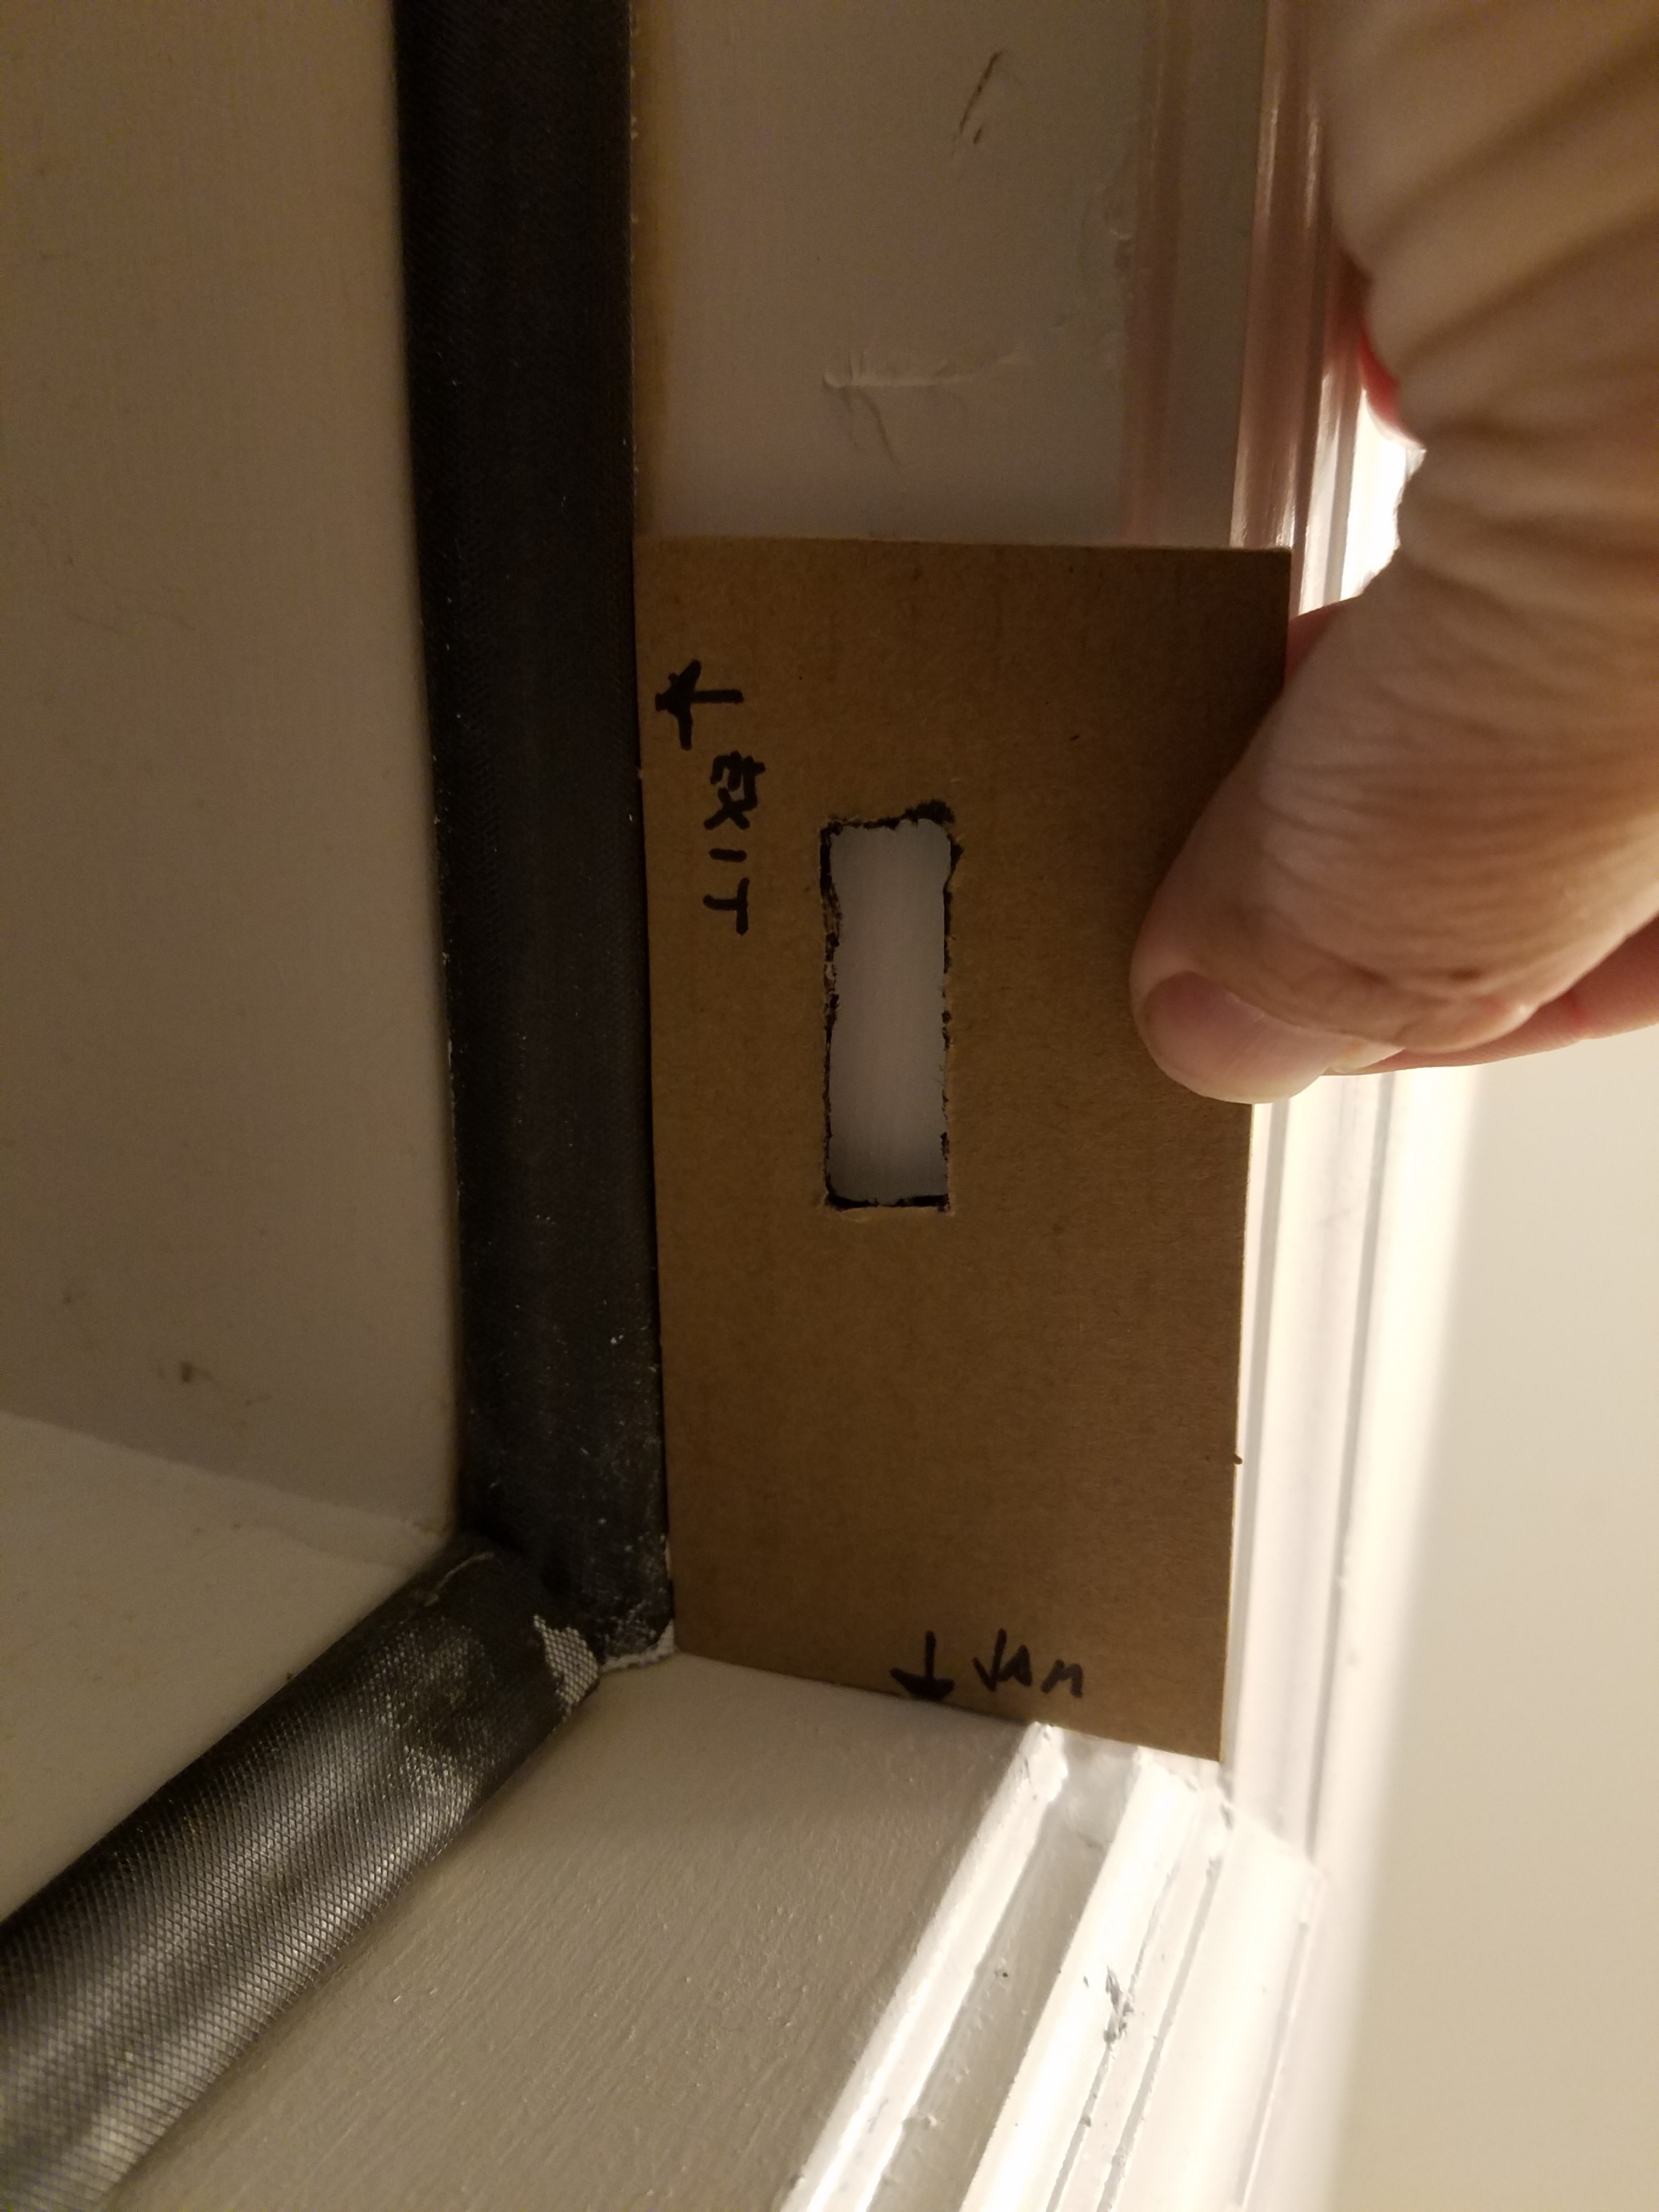
Clean the top of the door of any dust or dirt so it’s clean. Place the template on top of the door with the markings facing the appropriate direction (depending on whether the door is left handed or right handed will determine which side of the cardboard you use), Use a sharpie to mark the template on top of the door.
-
Do the same thing on the top of the door frame above the door. Use the opposite side of the cardboard template for the frame from the door top. Use the sharpie to mark the template.
-
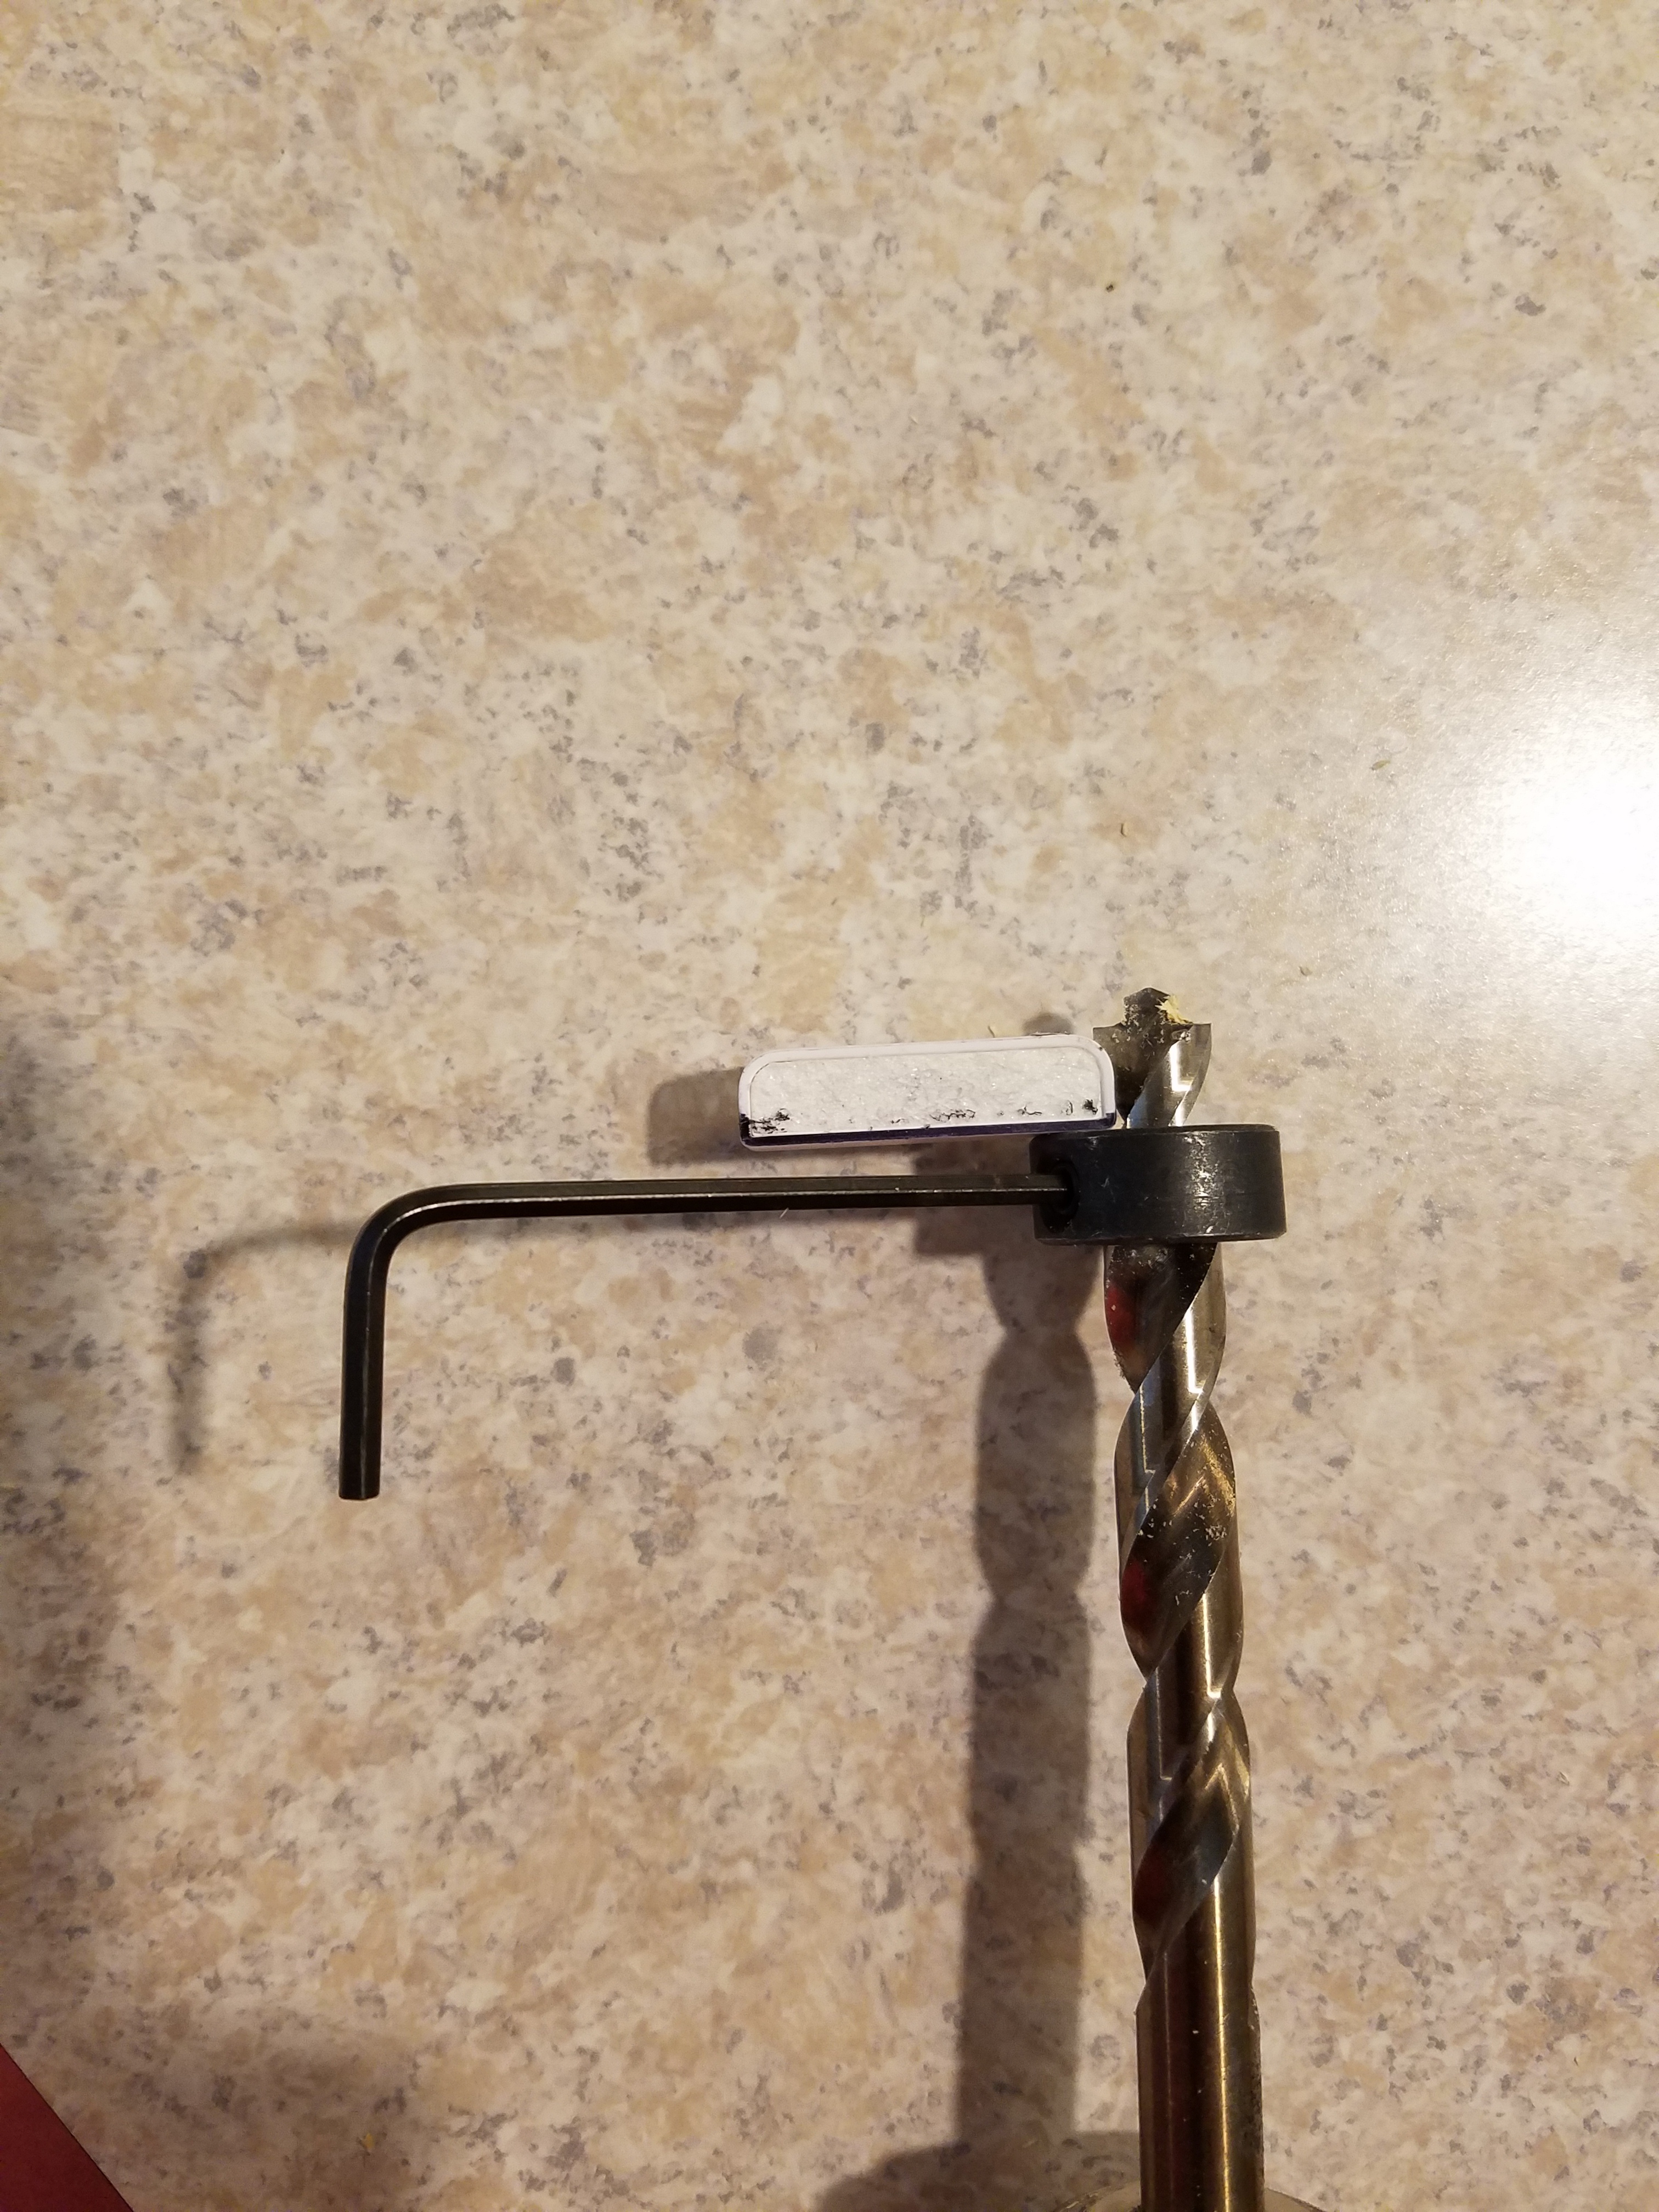
Place the depth stop collar on the drill bit equal to the depth of the sensor (see pic). Do not use the point of the drill bit as the starting point, start where it gets wide. Make sure the collar is secure.
-
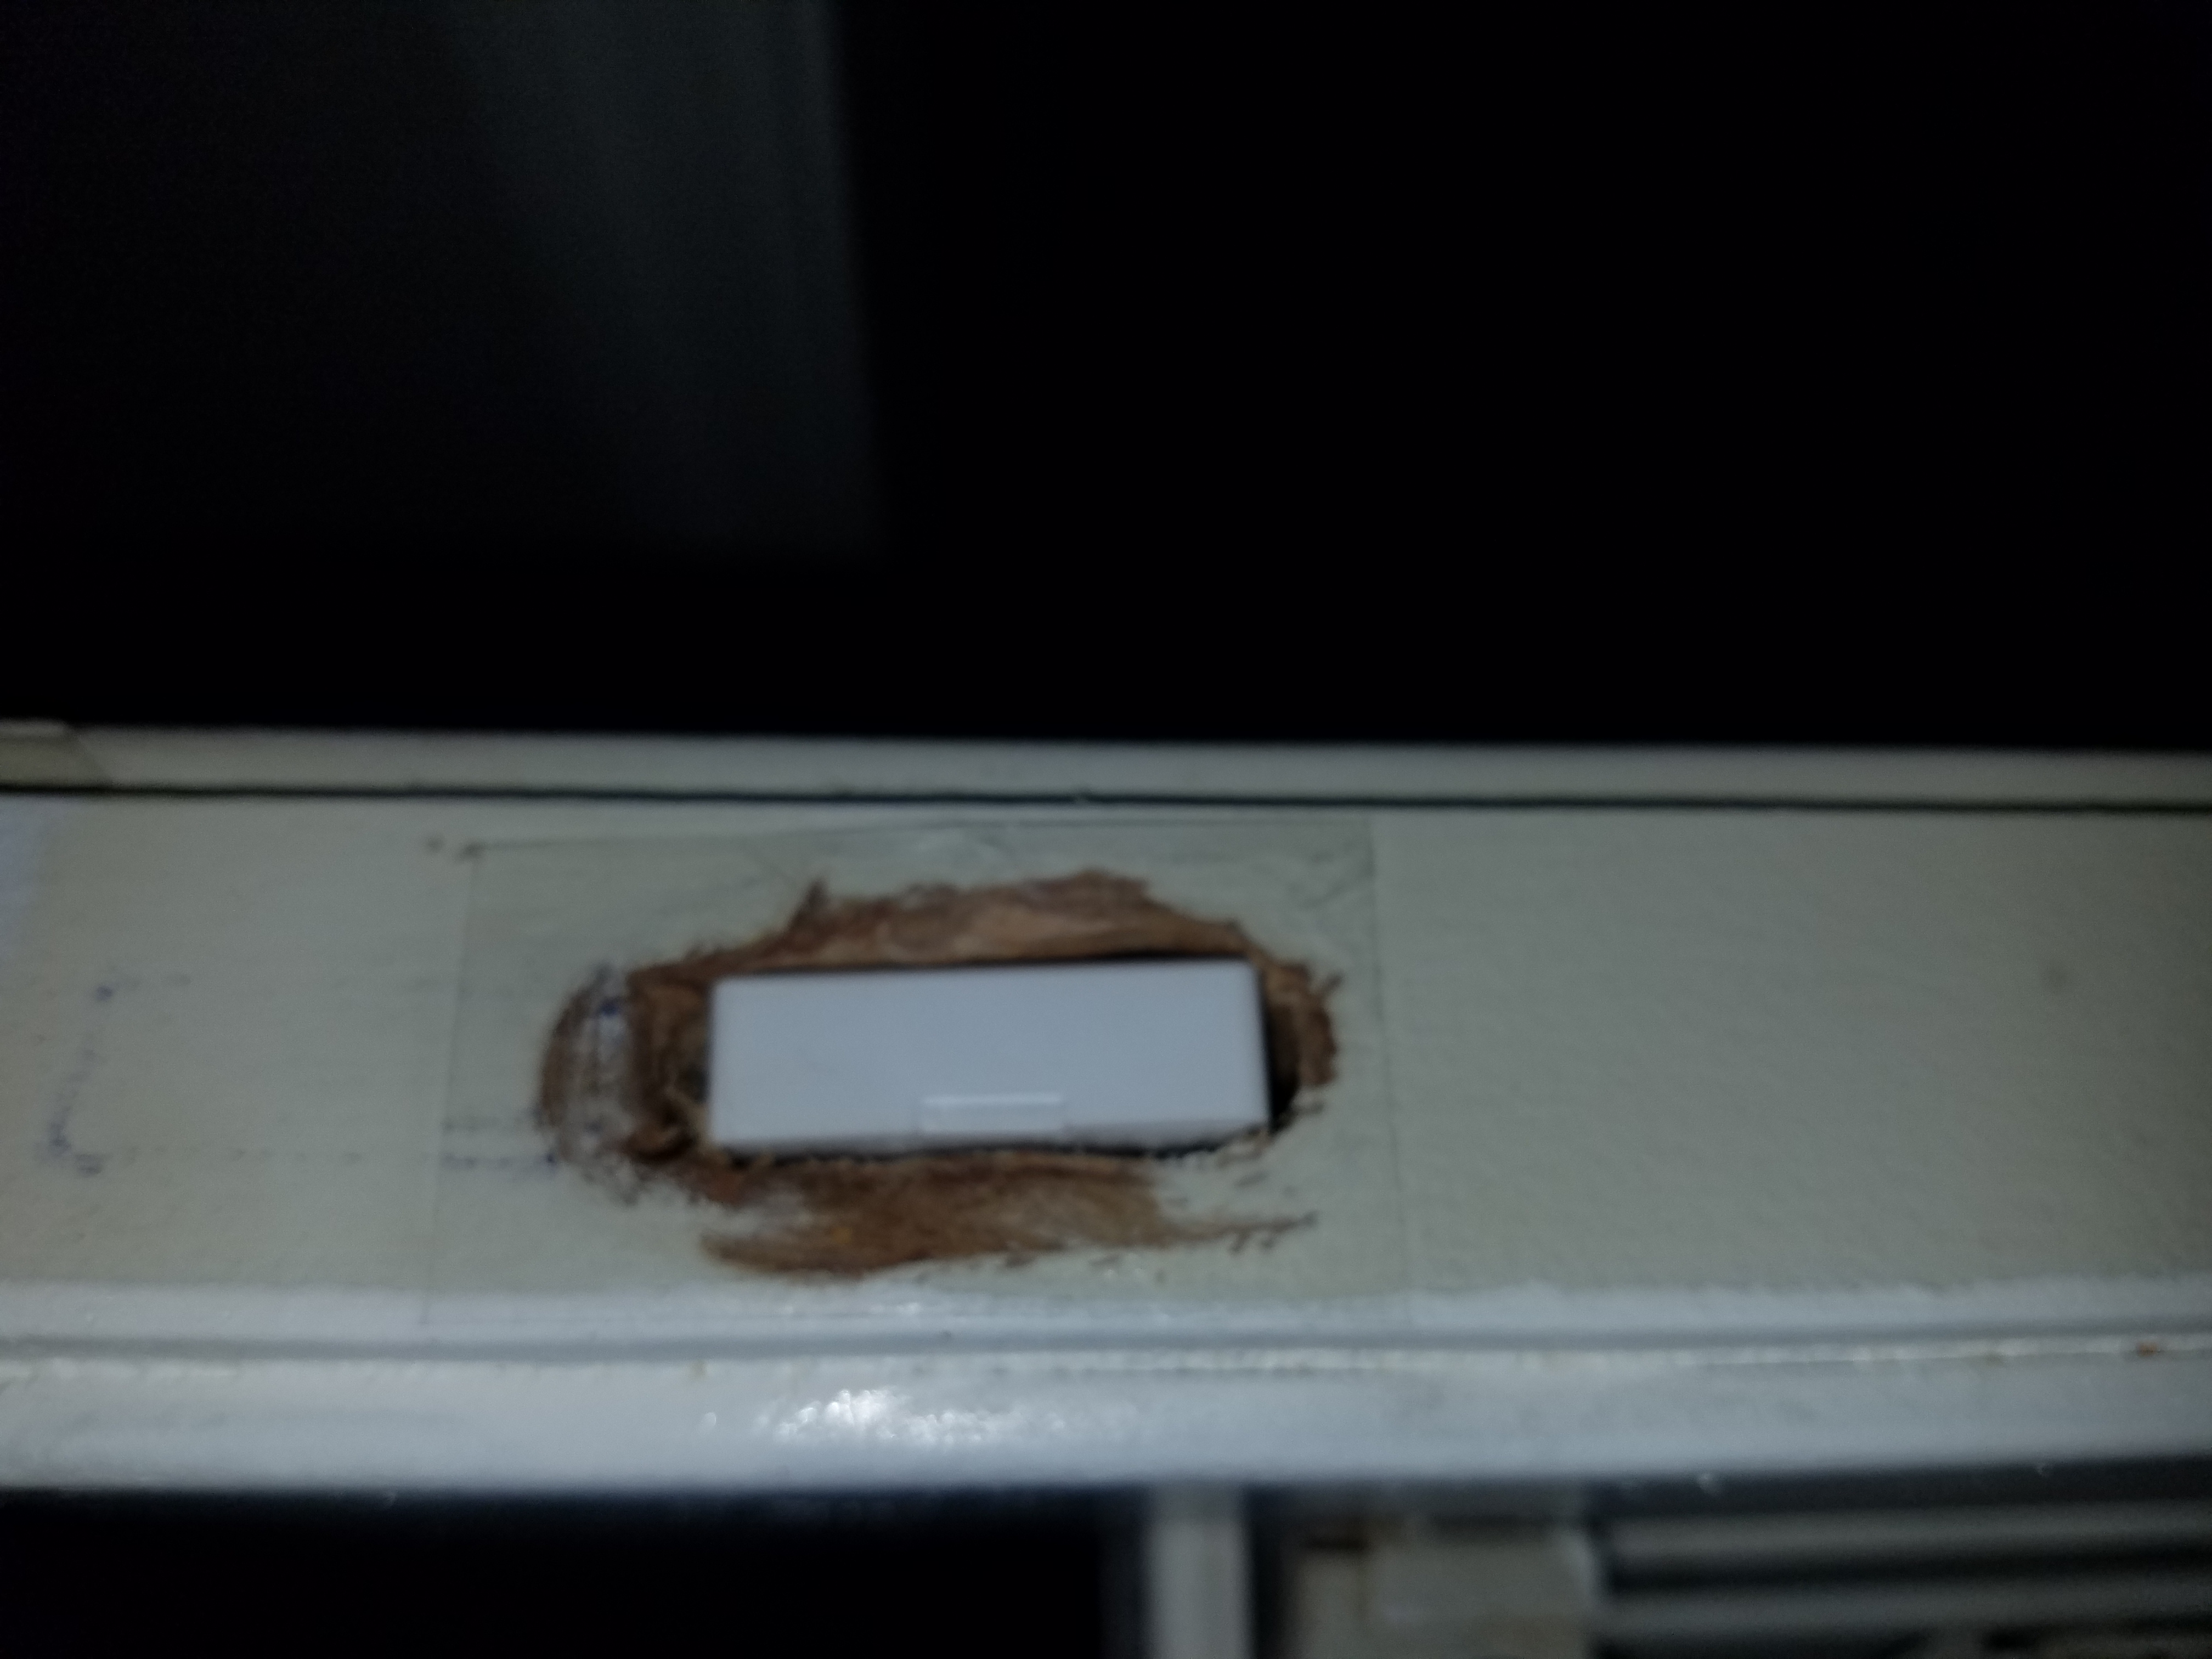
Drill out the template you outlined on the top of the door. I was able to make 3 holes, one on each end and one in the middle. Go slow and straight. Use the hammer and chisel to GENTLY clean up the hole and make is more square. You should end up with something like this when you are finished. Make sure the large sensor piece fits in here easily. DO NOT FORCE IT. If it doesn’t slide in and out with zero resistance, use the drill/chisel until you clear it out enough for the sensor to slide in and out easily.
-
Once the sensor is in the hole and is flush with the top of the door you need to secure it to prevent the magnet side of the sensor (the little side) from pulling the big side out of the hole. I used clear packing tape. DO NOT GLUE OR OTHERWISE MOUNT WITH ANY ADHESIVE!!! You’ll need to get this end out periodically to replace the batteries. For me, clear packing tape works and because it’s the top of the door, nobody will ever see it. Here is a pic of the bottom piece mounted.
-
Now adjust the collar on the 3/8" drill bit to the depth of the small sensor piece (the magnet) plus about 1/16" extra (will explain later). Make sure the collar is secure.
-
Drill out the top of the frame the same way you did the door. 3 holes (left, right, center) inside the template outline you made with the marker. Clean out the extra material with a few light taps of the chisel and if need be, run the drill back and forth to help clean out extra material. Go slow since it’s overhead.
-
Once the top side of the sensor fits in the hole just a little deeper than the door frame, you’re good to go. You don’t want this piece flush with the frame, you want it 1/16" deeper. Temporarily tape the top side and test the sensor to make sure it’s working on your Wyze app. Once you verify it’s working, remove the tape. The extra 1/16" allows you to caulk over the magnet piece and secure it. Since this side has no battery, you can caulk it in place. Smooth out caulk as best you can with fingers, a putty knife etc. This allows you to paint over the caulk and conceal the magnet side.


Paint if desired. When you need to change the battery, just pull the tape from the outsides of the main piece of the sensor. If the sensor is not jammed in the hole (remember I said it was important to go in easily with no resistance, this is why), it will come out with the tape or a thin object like a paperclip.
Get a new plastic mailbox
I really like this idea. You’d pay a lot extra for a WiFi connected dehumidifier just to get the same notification.